Get ready for the ultimate dessert experience! I’ll be making a decadent 16 Layer Chocolate and Peanut Butter Cake entirely on the Blackstone Griddle.
Layers of rich chocolate cake and creamy peanut butter filling come together to create a show-stopping treat that’s as delicious as it is impressive. Get my step-by-step guide as I cook this cake on the griddle and share tips for mastering this sweet creation at home.

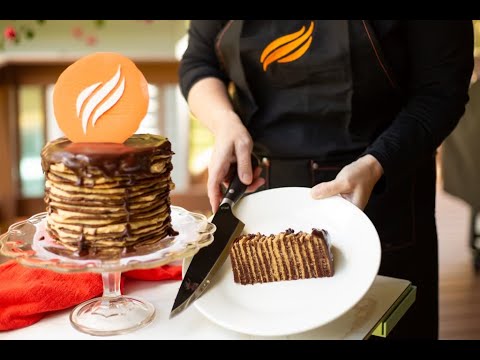
If you’re a chocolate and peanut butter lover, you’re in for a treat! This 16 Layer cake with peanut butter and chocolate was not only created on a Blackstone Griddle but also took home the Dessert category win in the Great Griddle Off 2024!
As a professional baker with over 20 years of experience running my licensed bakery, Sherry’s Sheer Delight, and with a culinary degree to back it up, I wanted to push my griddle skills to the next level for this competition.
This cake combines thin, indulgent layers of chocolate cake and fluffy peanut butter filling, each carefully crafted to perfection. Join me as I walk you through this unique recipe—perfect for those who love bold flavors, impressive presentation, and the thrill of cooking on a Blackstone Griddle!

This post may contain affiliate links. Read my privacy and terms of use policy.
Blackstone Griddle
My choice of flat top griddle is a Blackstone Griddle. Pick from a gas griddle or an electric griddle. They come in various sizes, accessories, and options. Learn more at my New Owners Blackstone Griddle Buyers Guide! I own, use, and love my Blackstone 36″ Griddle, Blackstone 17″ Electric Griddle, Blackstone 22″ Griddle with Blackstone Pizza Oven Attachment, and Blackstone Griddle 5 Piece Accessories Kit.

Chocolate and Peanut Butter Cake Ingredients
- Devil’s Food Cake Mix – Duncan Hines 15.25 ounce
- Eggs
- Vegetable Oil
- Water
- Creamy Peanut Butter
- Butter
- Powdered Sugar
- Vanilla
- Heavy Cream
- Semi-Sweet Chocolate Chips
- Orange Chocolate – Candy Melts
- White Chocolate
How to Prepare the Chocolate Cake
Prepare the cake batter: In a large mixing bowl, add the eggs, oil, cake mix, and water. Beat according to the directions on the box.
Preheat the Blackstone Griddle: If using an electric Blackstone Griddle set the temperature to 250°F. If using a gas Blackstone Griddle, set the temperature to low.
Use a 6 inch round cake template: Use an omelet ring, extra-large round cookie cutter, a spring form pan ring or make your own cake template.
Prepare the cake for griddle baking: Start with a sheet of parchment paper that has been lightly greased with cooking spray. Set the cake template onto the greased parchment paper. Pour a small amount of batter into the center of the ring. Use an offset spatula, spread the batter into an even layer within the circle ring making sure the batter is as even as you can get it.
Bake the Chocolate Cake on a Blackstone Griddle
Bake the griddle cake layers: Slide the cake layers onto the preheated griddle. Cover the whole griddle or each cake with a dome lid. Bake each layer for 15-18 minutes. Let the griddle cake bake until it is not sticky on top. Do not over bake the cake or you will end up with crispy layers. Pull off the griddle and let cool on the parchment paper. Repeat this process until all the griddle cake layers are baked.


How to Make the Filling, Ganache, and Stack the Cake
Prepare the peanut butter filling: Use a KitchenAid stand mixer fitted with the whip attachment. In a mixing bowl add the creamy peanut butter, softened butter and whip until smooth. Add the powdered sugar along with the vanilla and mix until combined making sure to scrape the side of the mixing bowl. Pour the 2/3 cup heavy cream in a couple stages and whip until fluffy smooth.
Stack the cake: Use a cake stand or a board to build the layered cake. Start with a layer of the chocolate cake and then spread a layer of the fluffy peanut butter filling, making sure the filling is in a thin even layer. Repeat this process until all the chocolate cake and peanut butter filling layers have been added.
Prepare the ganache topping: Preheat the Blackstone griddle to low heat. Add the ½ cup heavy cream to a metal bowl and place on the griddle to warm up. Heat the heavy cream until almost boiling making sure to stir often to prevent scorching. Add the semi sweet chocolate chips to another bowl. When the heavy cream is heated up, pour it into the chocolate chips and stir with a whisk until all the chocolate is melted and the ganache is completely combined.
Top the cake with ganache: Pour the warm ganache over the top of the cake with peanut butter and chocolate and spread with a spatula to help it drip over the edges. Use as little or as much of the ganache as you would like.


How to Make a Chocolate Logo
Prepare the logo: Print the logo to the size that you want on a sheet of paper. Tape the paper logo to a cutting board. Cover the logo with a piece of wax paper so that you can trace it with chocolate.
Melt the chocolate: While the Blackstone griddle is preheated on the lowest setting, place the orange chocolate into a small glass mason jar. As the chocolate melts, stir so that it does not burn or overheat.
Pipe the logo: Prepare a piping bag with a #4 tip. Once the chocolate is completely melted, pour it into the piping bag. Pipe a circle along the edge of the printed logo. Then fill in the circle with more melted chocolate being careful not to overfill the circle. Once the circle is filled, tap the cutting board to help remove any air bubbles and to smooth out the melted chocolate.
Chill the chocolate & make legs: With the leftover chocolate, pipe a 2 inch v shape onto the wax paper. Place the circle and legs into the refrigerator for 15 minutes. Let the chocolate set up.
Add the flame: Cut the flame out of the Blackstone paper logo. This will be your stencil for the white flames. After the chocolate circle is set, melt the white chocolate like you did for the orange chocolate. Remove the orange chocolate circle from the wax paper and flip over. Place the paper flame stencil onto the circle. Use a small offset spatula and spread an even thin layer of the chocolate across the stencil. Peal the stencil off and let the white chocolate set up.


Top the Cake with the Logo
Place the chocolate centerpiece onto the cake: Use some of the extra melted chocolate to glue the v shaped chocolate legs onto the back of the circle logo. Set the chocolate logo into the center top of the cake.

More Blackstone Griddle Dessert Recipes
I love creating desserts on my Blackstone griddle! Learn all the tips and tricks to baking on your griddle with my collection of Blackstone Easiest Dessert Recipes. My mini Oreo cheesecakes are super delicious, but you need to try my Blackstone Griddle monkey bread with biscuits, cupcakes on the griddle, and small batch griddle cookies.
What to Serve with this Layered Cake
Make a complete meal when you serve this show piece 16 layer cake. Try this kung pao chicken and noodles along with one of my favorite freezer door cocktails!

16 Layer Cake with Peanut Butter and Chocolate
I’ll be making a decadent 16 Layer Chocolate and Peanut Butter Cake entirely on the Blackstone Griddle. Layers of rich chocolate cake and creamy peanut butter filling come together to create a show-stopping treat that’s as delicious as it is impressive.
Ingredients
- 1 Box Devil’s Food Cake Mix - Duncan Hines 15.25 ounce
- 3 Eggs
- ½ cup Vegetable Oil
- 1 cup Water
- 2 cups Creamy Peanut Butter
- 10 tablespoons Butter - Softened
- 2 cups Powdered Sugar
- 1 ½ teaspoon Vanilla
- 2/3 cup Heavy Cream
- 4 ounces Semi-Sweet Chocolate Chips
- ½ cup Heavy Cream - Warmed
- 1 cup Orange Chocolate - Candy Melts
- ¼ cup White Chocolate
Instructions
How to Prepare the Chocolate Cake
- Prepare the cake batter: In a large mixing bowl, add the eggs, oil, cake mix, and water. Beat according to the directions on the box for 2 minutes making sure to scrape the side of the bowl.
- Preheat the Blackstone Griddle: If using an electric Blackstone Griddle set the temperature to 250°F. If using a gas Blackstone Griddle set the temperature to low.
- Create a 6 inch round cake template: This step is important because you want the cooked cake layers to be the same size for proper stacking when you assemble the chocolate peanut butter cake. Cut out the top of a 6 inch plastic lid for a cake pattern. You can also use an omelet ring, extra-large round cookie cutter, or a spring form pan ring as a pattern.
- Prepare the cake for griddle baking: This step is prepared off the griddle and then placed on the griddle when ready to griddle bake. Use a sheet of parchment paper that has been lightly greased with cooking spray. Set the ring onto the greased parchment paper. Using 2 - #40 scoops of cake batter or 1 - #20 scoops of cake batter, pour into the center of the ring. Use a small offset spatula, spread the batter into an even layer within the circle ring making sure the batter is as even as you can get it.
Bake the Chocolate Cake on a Blackstone Griddle
- Bake the cake layers: Slide the prepared parchment paper cake layers onto the preheated griddle. On my 17 inch electric griddle, I was able to fit 2 layers of cake per cycle. Doing 8 cycles to make the 16 layers. Cover the whole griddle or each cake with a dome lid. Bake for 15-18 minutes. Every griddle will cook differently, so adjust baking time if needed. Let the cake bake until it is not sticky on top. Do not over bake or you will end up with crispy layers. Once baked, pull off the griddle and let cool on the parchment paper. Repeat this process until all the cake layers are baked.
How to Make the Filling, Ganache, and Stack the Cake
- Prepare the peanut butter filling: Use a stand mixer fitted with the whip attachment. In a mixing bowl add the creamy peanut butter, softened butter and beat until smooth making sure to scrape the side of the bowl often. Add the powdered sugar and vanilla and mix until combined. Scrape the side of the mixing bowl. Pour the 2/3 cup heavy cream in a couple stages and whip until fluffy.
- Stack the cake: Use a cake stand or a board to build the layer cake. Start with a layer of the cake and then add a layer of the fluffy peanut butter filling, making sure the filling is spread into a thin even layer. Repeat this process until all the cake and peanut butter filling layers have been added.
- Prepare the ganache topping: Preheat the griddle to low heat. Add the ½ cup heavy cream to a metal bowl and place on the griddle. Heat the heavy cream until right before boiling making sure to stir often to prevent scorching. Add the chocolate chips to another bowl. Once the heavy cream is heated up, pour it into the chocolate chips and stir with a whisk until all the chocolate is melted and the ganache is completely combined.
- Top the cake with ganache: Pour the warm ganache over the top of the cake and spread with a spatula to help it drip over the edges, if needed. You might not use all the ganache.
How to Make a Chocolate Logo
- Create the Chocolate Blackstone logo: Print the Blackstone logo to the size that you want on a sheet of paper. Tape the paper to a cutting board. Cover the logo with a piece of wax paper so that you can trace it. While the griddle is preheated on the lowest setting, place the orange chocolate into a small glass jar. As the chocolate melts, stir so that it does not burn. I will also place a very wet old, folded towel under the jar to help prevent burning. Prepare a piping bag with a #4 tip. You can also use a zip lock bag and just cut a small corner of the bag. Once the orange colored chocolate is completely melted, pour it into the piping bag. Pipe a circle along the edge of the logo. Then fill in the circle with more chocolate being careful not to over fill the circle. Once the circle is filled, gently tap the cutting board to help remove any air bubbles and to smooth out the orange chocolate. Place the chocolate circle into the refrigerator for 15 minutes. With any leftover chocolate, pipe a 2 inch v shape onto the wax paper. Let set up. This will be the legs to hold up the Blackstone logo.
- How to add the flame: Cut the flame out of the Blackstone logo. This will be your stencil for the white flames. After the orange chocolate circle is set, melt the white chocolate like you did for the orange chocolate. Remove the orange chocolate circle from the wax paper and flip over. Place the flame stencil onto the circle. Use a small offset spatula and spread a thin layer of the chocolate across the stencil. Carefully remove the stencil and let the white chocolate set up.
Top the Cake with the Logo
- Place the chocolate centerpiece onto the cake: Use some of the extra melted chocolate to glue the v shaped legs onto the back of the circle logo. Once you have the cake in the place that you want to serve it, carefully set the chocolate Blackstone logo into the center top of the cake. Serve right away. Store any leftovers in the refrigerator for up to 6 days or freeze for up to 3 months.
Recommended Products
As an Amazon Associate, I earn from qualifying purchases. This page contains affiliate links. Click on the highlighted text in a post to explore a product. If you purchase through one of them, I will receive a commission (at no additional cost to you). I ONLY EVER ENDORSE PRODUCTS THAT I TRULY LOVE. Thank you for your support!

Nutrition Information
Yield
16Serving Size
1Amount Per Serving Calories 599Total Fat 41gSaturated Fat 15gTrans Fat 1gUnsaturated Fat 22gCholesterol 74mgSodium 430mgCarbohydrates 52gFiber 3gSugar 35gProtein 10g
Note: For exact nutritional information, consult your dietitian. All nutritional information is simply a guideline.
Did you enjoy this recipe? Your comment and 5-star rating take just seconds but helps other readers and helps our site gain more readers! Thank you for taking the time to share your comments!
Stay in touch with me through social media!
Tried this recipe? Snap a picture and tag #frommichigan2019 on Instagram @frommichigan2019.
Join my Blackstone Griddle Facebook Pages:
Subscribe to my YouTube channel – Sherry Ronning – to get notification of my latest videos.
If you enjoy this recipe, you may enjoy the following: 140+ Blackstone Griddle Recipes
